Showing posts with label SSIS. Show all posts

Friday, October 16, 2009

Exporting Binary Files To The File System

In my last post I demonstrated how to use SSIS to load binary files into a SQL Server 2005 VARBINARY(MAX) column, http://jahaines.blogspot.com/2009/10/ssis-importing-binary-files-into.html.  This post will focus on recreating the binary documents on the file system.  I will be using a combination of TSQL and the BCP utility to perform the export, http://msdn.microsoft.com/en-us/library/ms162802.aspx.  I will be using the same table and data from the last post.  I will start by creating the TSQL to dynamically create a BCP command.

Below is the stored procedure I will use to export the data.  You will see that I have decided to use a cursor to process all documents.  The procedure also accepts a DocID, which limits the export to a single document.  A cursor is fine here because we are limited to executing a single BCP command; however, you could create an SSIS package that executes the stored procedure across multiple streams, if you need parallel processing.

CREATE PROCEDURE usp_ExportBinaryFiles(
    @DocID INT = NULL,
    @OutputFilePath VARCHAR(500) = 'C:\'
)
AS 
BEGIN
 
DECLARE @sql VARCHAR(8000)
 
IF @DocID IS NULL --Open Cursor to export all images
BEGIN
 
    DECLARE curExportBinaryDocs CURSOR FAST_FORWARD FOR
    SELECT 'BCP "SELECT Doc FROM [tempdb].[dbo].[Documents] WHERE DocId =' 
        + CAST(DocId AS VARCHAR(5)) + '" queryout ' + @OutputFilePath 
        + DocName + '.' + DocType + ' -S A70195\Dev -T -fC:\Documents\Documents.fmt'
    FROM dbo.Documents
 
    OPEN curExportBinaryDocs
    FETCH NEXT FROM curExportBinaryDocs INTO @sql
 
    WHILE @@FETCH_STATUS = 0
        BEGIN
            --PRINT @sql
            EXEC xp_cmdshell @sql,NO_OUTPUT
            
            FETCH NEXT FROM curExportBinaryDocs INTO @sql
        END
 
    CLOSE curExportBinaryDocs
    DEALLOCATE curExportBinaryDocs
END
ELSE --Export a single image
BEGIN
    SELECT @sql = 'BCP "SELECT Doc FROM [tempdb].[dbo].[Documents] WHERE DocId =' 
        + CAST(DocId AS VARCHAR(5)) + '" queryout ' + @OutputFilePath 
        + DocName + '.' + DocType + ' -S A70195\Dev -T -fC:\Documents\Documents.fmt'
    FROM dbo.Documents
    WHERE DocID = @DocID
    
    --PRINT @sql
    EXEC xp_cmdshell @sql,NO_OUTPUT
END
 
END
GO

The above stored procedure dynamically builds a BCP command.  Currently the stored procedure has two main parameters, DocID and OutputFilePath.  DocID is used when you want to export a single row, if no value is supplied the stored procedure will export all documents.  The outputFilePath is the directory where the files will be exported.  You will note that I have hard coded my server name and format file path.  You can add additional parameters if you need these attributes to be dynamic.  The next item on my list is to actually create the format file.  Create a .fmt file somewhere on your file system.   I put mine in the same folder as my other documents.  Copy the code below into the format file.

9.0   
1   
1       SQLBINARY     0       0       ""   1     Doc                                       ""  

You may be asking yourself, why the format file looks skimpy, or is lacking content.  The format file is lacking content because it only has what we need.  All we need in the format file is the VARBINARY(MAX) column and its data type. You can find more info on format files here, http://msdn.microsoft.com/en-us/library/ms191516.aspx.

Once the format file is in place, we can execute our stored procedure to process all documents.

EXEC dbo.usp_ExportBinaryFiles @OutputFilePath = 'C:\Documents\BCP_Out\'

That’s it!  It is that easy to output VARBINARY data onto the file system.  SQL Server 2005 has a slue of tools that make working with binary data very simplistic.  I hope that you have learned something new. Please stay tuned, as I plan to focus more on TSQL concepts and performance considerations.

Until next time happy coding.

Wednesday, October 14, 2009

SSIS – Importing Binary Files Into A VARBINARY(MAX) Column

Have you every had the need to import images, Word documents, Excel documents, or any other type of file into a SQL Server table?  If yes, you are in luck.  SQL Server 2005 gives us a powerful and scalable method to import binary files or documents, into a relational table.  I will be using the term binary file and document interchangeably throughout this post to describe a file on the file system.  I will be utilizing SSIS and the VARBINAARY(MAX) data type to import the document. Let us start by creating the sample DDL.  In this example, I will need a staging table and a table to house our binary data. 

USE [tempdb]
GO
 
IF OBJECT_ID('tempdb.dbo.[Doc_Stage]') IS NOT NULL
BEGIN
    DROP TABLE [dbo].[Doc_Stage];
END
GO
 
CREATE TABLE [dbo].[Doc_Stage](
DocId INT IDENTITY(1,1) PRIMARY KEY,
DocName VARCHAR(50) NOT NULL,
DocPath VARCHAR(1000) NOT NULL,
DocType VARCHAR(4) NOT NULL
);
GO
 
IF OBJECT_ID('tempdb.dbo.[Documents]') IS NOT NULL
BEGIN
    DROP TABLE [dbo].[Documents];
END
GO
 
CREATE TABLE [dbo].[Documents](
DocId INT IDENTITY(1,1) PRIMARY KEY,
DocName VARCHAR(50) NOT NULL,
Doc VARBINARY(MAX) NULL,
DocType VARCHAR(4)
);
GO

Next, I need to create the SSIS package.  The first step is to add an Execute SQL Task to the designer canvas.  Configure the Execute SQL Task, as shown below.

Note: You will need to create the source connection to the database where you created the DDL

image 

The SQL Statement that I used is below.

TRUNCATE TABLE [dbo].[Doc_Stage] ;

Next I will create a variable called FilePath that is of the string data type.  Now I am ready to add a ForEach Loop Container to the canvas.  Add the container to the canvas and configure it as shown below.

Note: I am grabbing all file types. If you only want a specific type, change the File to include the extension that you want.  E.g. *.jpg

image image

Next, I will have to create another Execute SQL Task, but this time, I have to drag the task into the ForEach Loop Container.  Configure the task as shown below.

image

The SQL Statement is presented below:

INSERT INTO [dbo].[Doc_Stage](DocName,DocPath,DocType) VALUES ('DocName','DocPath','jpg');

Now for the tricky part.  In this step, I have to build an expression to dynamically build an insert statement.  The insert will capture the document name, path, and type.  Click the expressions tab and create an expression, on the property SQLStatementSource (near the bottom).  Below is the code for the expression.

"INSERT INTO [dbo].[Doc_Stage](DocName,DocPath,DocType) VALUES ('" +
REPLACE(RIGHT(@[User::FilePath],FINDSTRING(Reverse(@[User::FilePath] ) ,"\\", 1)-1),RIGHT(@[User::FilePath],4),"")
+ "','" + @[User::FilePath] 
+ "','" + RIGHT( @[User::FilePath] ,FINDSTRING( REVERSE(@[User::FilePath] ),".",1)-1)
+ "');"
 

With that out of the way, we can press on.  The last task I will need is a Data Flow Task.  Drag the data flow task to the canvas.  Here is what my canvas looks like at present:

image

Open the Data Flow task and drag an OLE DB Source to the canvas and configure it as shown below.

image 

Make sure to click the Columns tab to set the column mappings.  Next, I will drag a Import Column Transformation to the canvas and configure it as shown below.

image image

Note: Make sure to take note of the output column’s LineageID.  You will need to take this ID and add it to the Input Column’s FileDataColumnID.

image image

We are almost there!!! The last step is to add the OLE DB Destination.  I will add the OLE DB Destination and configure it as shown below. Do not forget to click the Mappings tab to map the columns.

image

That’s it!!!! Click the debug button and all of the components should light up green. I have successfully implemented a document library solution that allows the insertion of any document type into SQL Server 2005.  Stay tuned because I will show you how to export the images to the file system using BCP and TSQL.

Until next time happy coding.

Wednesday, September 30, 2009

SSIS – Performing An UPSERT

For those of you who may be wondering what the heck an UPSERT is, an UPSERT is an UPDATE and INSERT into a given table. Typically, an UPSERT operation requires two separate transactions. Usually, the first transaction issued is the UPDATE and then the INSERT is issued shortly after. In this post I will be extending the package I created, in my previous post, http://jahaines.blogspot.com/2009/09/ssis-only-inserting-rows-that-do-not.html. Once your SSIS package resembles the package in the link, you can proceed with the next step. If you want to skip the prior post, you can download the package at the bottom on this post.

The first item of interest is the Lookup transformation. First I will drag an OLE DB Command onto the canvas and connect it to the Lookup transformation. A dialog box should appear. When the dialog box appears choose the Lookup Match Output, in the Output dropdown list. An OLE DB Command, is a parameterized TSQL statement that can issued against a given data set. Before I start configuring the transformation, I would like to point out that this method is extremely easy to setup, but has a major drawback. The OLE DB Command has to be issued for each row returned by the Input, so this type of process works recursively or iteratively. I will demonstrate another method later in this post. With that out of the way, I will start configuring the transformation. First, I will build an UPDATE command using parameters for each column and the predicate.

My canvas currently looks like the screenshot below.

image

The next step is to configure the OLE DB Command transformation. Double-click the OLE DB Command transformation. In the Connection Manager dropdown list, choose the database where you created dbo.SSIS_Import. Click the “Component Properties” tab. Within the “Component Properties” tab, you will need to click the ellipses next to the “SQL Command” property. Paste the code presented below into the box and click ok.

UPDATE dbo.SSIS_Import
SET 
     SomeInt = ?,
     SomeChar = ?
FROM dbo.SSIS_Import import
WHERE SomeId = ?

The code above is a pretty simplistic UPDATE statement. The key thing to note is the “?”. Each of the ‘?” will be given a parameter value in SSIS. The parameters are dynamically named in the order they appear in the command. Next, I will be mapping these parameters to my input columns. Click the “Column Mappings” tab. Align the input columns to each parameter. My column mapping is shown below. Once complete, click “Ok.”

image

That it!!! We have successfully created an UPSERT operation using SSIS… but wait what is the catch? The catch is the UPDATE will operate like a cursor processing one UPDATE command at a time, which can be a nightmare from a performance standpoint. You may be wondering how we can make this process set based. There is not much you can do in SSIS alone, so I will need to find other means. The best way to make this process more scalable is to leverage SQL Server and SSIS.

The first step is to drop the OLE DB command I just created. I will then drag a OLE DB Destination to the canvas and connect it to the Lookup Match Output. My canvas looks like below.

image

Next, I will switch gears and write some TSQL code. I will need to open SSMS and connect to the database where dbo.SSIS_Import exists. Firstly, I have to create a view. I will not use the view to select data, but will use the view as a intermediate object to insert data.

CREATE VIEW vw_SSIS_Import
AS
SELECT [SomeId],[SomeInt],[SomeChar]
FROM dbo.[SSIS_Import]
GO

Now that my view is created, I am going to create an INSTEAD of trigger, on my view. The instead of trigger will allow me to use my OLE DB Destination to bulk insert from SSIS. The bulk insert from SSIS gives me a mechanism to pass the rows for UPDATE, as a set of data. Once I have the rows in a set, the trigger can efficiently UPDATE the data.

CREATE TRIGGER trg_UPdate_SSIS_Import
ON dbo.vw_SSIS_Import
INSTEAD OF INSERT
AS 
BEGIN
 
    UPDATE import
    SET 
        SomeInt = i.SomeInt,
        SomeChar = i.SomeChar
    FROM dbo.SSIS_Import import
    INNER JOIN inserted i
        ON i.SomeId = import.SomeId
 
END
GO

In the code above, I am using efficient TSQL to update all rows that are inserted into the view, from the SSIS package. I am now ready to configure the OLE DB Destination. Double-click the OLE DB Destination to launch the configure dialog box. Make sure your package is using the right connection manager and choose the view. Click the “Column Mappings” tab and then click '”Ok.” Right-click the OLE DB Destination and choose properties. In the “Fast Load Options”, type “FIRE_TRIGGERS.” This allows the SSIS insert to fire the INSTEAD OF trigger, on the view. That’s it we are done!!! The view/INSTEAD OF TRIGGER method is extremely easy to configure and implement; however, it does require that additional database objects to be created.

There you have it. I have demonstrated two methods to UPSERT data, using SSIS. The first method relies on the OLE DB Command, which has the limitation of having to run for each and every row. The latter option is a more scalable solution that requires the creation of a view and trigger. Both methods have pros and cons and I leave it to you to determine which is best for your environment.

Until next time, Happy Coding.

PS: If you want to do all of the work in SQL, you can allow the trigger to perform the UPDATE and INSERT. This method reduces the complexity of the SSIS package because you only need a single source and destination, with no Lookup.

Download SSIS Package:

Note: The package was created in BIDS 2008, which is not compatible with BIDS 2005.

Sunday, September 27, 2009

SSIS – Only Inserting Rows That Do Not Exist

I have seen an overwhelming trend that suggests that today’s TSQL/BI developers are very interested in using Microsoft’s BI (Business Intelligence) product, SQL Server Business Intelligence Development Studio aka BIDS.  For those of you who may not know, BIDS is installed when SQL Server is installed.  BIDS is nothing more than a Visual Studios add-in that uses the .Net Framework.   BIDS allows you to do Analysis Services (Cube Design and management),  Reporting Services, and Integration Services.  The BI platform that I will be focusing on today is SSIS (SQL Server Integration Services).  SSIS is used for ETL, which is a acronym for  Extract- Transform-Load.  Essentially SSIS is used to migrate data from many different sources,  including MS Access, Excel, Text Files, Oracle, SQL, AS400 etc, while allowing data transformations between source and destination.  The problem that most import processes have is flexibility.  Some bulk import APIs do not have an easy method to import new data, or data that does not currently exist in a table.  In these cases, the import process has to import all source data, then another command has to be issued to filter and insert the data.  A great example of this is BCP or the Bulk Insert command.  SSIS gives developers an easy and efficient method to insert new data.  This is where I will be focusing my efforts today, in a future post, I will demonstrate how to do an UPSERT (Update existing and Insert new) operation using SSIS.  Okay let’s start by creating a sample table.

--Switch DB context to Tempdb
USE [tempdb]
GO
 
SET NOCOUNT ON;
GO
 
--Drop table if exists
IF EXISTS(SELECT 1 FROM sys.tables WHERE NAME = 'SSIS_Import')
BEGIN
    DROP TABLE dbo.SSIS_Import;
END
GO
 
--Create table
CREATE TABLE dbo.SSIS_Import(
SomeID INT PRIMARY KEY,
SomeInt INT,
SomeChar CHAR(1)
);
GO
 
--Insert some test data
INSERT INTO dbo.SSIS_Import ([SomeID],[SomeInt],[SomeChar]) VALUES (1,1,'A');
INSERT INTO dbo.SSIS_Import ([SomeID],[SomeInt],[SomeChar]) VALUES (2,5,'B');
INSERT INTO dbo.SSIS_Import ([SomeID],[SomeInt],[SomeChar]) VALUES (3,8,'C');
INSERT INTO dbo.SSIS_Import ([SomeID],[SomeInt],[SomeChar]) VALUES (4,2,'D');
GO

Now that our table exists, I am going to shift gears and start creating the SSIS package. Before creating the package, you should create a Pipe delimited text file on the C: drive, called SSIS_Import.txt.  Below is a sample of my file.

1|100|U
2|200|V
5|300|W
8|400|X
9|500|Y
10|600|Z

Okay now we can start creating our SSIS package.  You should now be looking at a blank canvas, the first objective is to drag a Data Flow Task onto the canvas.  Your canvas should look like below.

image

Note: I have renamed my data flow task to represent what it is doing.

I will now configure the Data Flow Task.  Double-click the data flow task to open the data flow task designer canvas. Drag a “Flat File Source” to the canvas.  Double-click the Flat File Source and create a new connection.  Your connection should be configured as shown below.

image

You will see an error message at the bottom on the window, stating the columns are not defined.  All you need to do is click the Advanced tab and make sure the data types and length are correct.  Column 0 and column 1 should be of type “four byte signed integer” and column 2 is a string with a length of 1.   In addition to configuring the data types, you should rename the columns.  You can change the name of a column by typing a new name in the Name property field.  The names should align with the table, so the mappings should look like this:

  • Column 0 –> SomeId
  • Column 1 –> SomeInt
  • Column 2 –> SomeChar

After all configurations, your configuration should look like below.

image

Once the Flat File Source is configured, click “Ok” and “Ok” again.  The next step is to drag a “Lookup” transformation to the canvas and connect the Source connection to the Lookup transformation via the green precedence constraint.  Double-Click the Lookup transformation to configure it.  The first thing I have to do is change how errors are handled.  By default, if a single value is not found in the source, the entire Lookup component fails.  We will need to make sure non matching rows are redirected to the error output, as shown below.

image

Next, I will configure the connection.  Click the connection tab and the “New” button again.  The OLE DB connection should point to the database where the SSIS_Import table is.  Your screen should look like below.

image

Next we have to configure the key columns.  For the sample table the key column is SomeID, which maps to the Column 0, or SomeID if you renamed the column in your flat file connection manager, as shown below.

Note: To create the relationship you will have to drag the source column to the destination column.

image

Once you have finished configuration of this component, click “Ok” to save the changes.  Your canvas should be look like the screenshot below.

image

Next drag a OLE DB Destination to the canvas.  Make sure you drag the red arrow (precedence constraint) to the OLE DB Destination, which should cause a dialog box to popup. When it does just click “Ok.”  The destination controls where the source data will be inserted.  Double-click the OLE  DB Destination and make the destination point to the SSIS_Import table, as shown below.

image

Now click the mappings tab to map the source columns to the destination columns.  I have renamed my source columns, so SSIS will automatically map the columns for me. Click “Ok”, once you have mapped all the columns.

image

That is it!!! The final canvas will look like the screenshot below. 

image

All that is left is testing.  Click the debug button (looks like a “Play” button). If you have correctly configured all the steps,  the components will light up green.  If any turn red, something is not configured properly. Once all components light up green, run a simple select statement over the table to make sure it did what is supposed to do.

There you have it a method that takes less than 5 minutes to configure and will migrate new data only.  I hope that you have enjoyed reading this post and can make use of this in your environment. Stay tuned…… my next step is to Update pre-existing rows, using SSIS.  This is commonly known as an UPSERT.  I will show you a few ways to accomplish this task and the performance considerations, for each method.

Until next time… Happy Coding.

Tuesday, July 21, 2009

Centralized Data Collecting, Using SSIS

What is the best method to centralize data collection and/or history metadata related to SQL Server Instances?  This is a common question that a lot of companies/developers ask themselves.  A lot of solutions, especially pre SQL Server 2008,  require objects to exist on each participating instance, or require that you create a batch process that loops through a text file of server names.  SQL Server 2008 introduced a centralized storage mechanism to collect and manage performance data for 1 or more instances, aliased as Data Management Warehouse.  Here is a great link that briefly covers the new 2008 feature, http://www.simple-talk.com/sql/learn-sql-server/sql-server-2008-performance-data-collector/.  Today I will be focusing on a highly scalable SSIS solution.  SSIS offers a lot of flexibility,  scalability and has a lot of different security measures, that are not available to TSQL and command line programming.   For those unfamiliar with SSIS, SSIS (SQL Server Integration Services) is a tool used to transform and load data amongst a variety of sources including SQL Server, flat files, Oracle, AS400, MS Access etc.   In a recent blog post, I demonstrated how to setup a new SSIS package and how to dynamically change the destination file name.  This post has a lot of meat for beginners and may be worth a read,  http://jahaines.blogspot.com/2009/07/ssis-dynamically-naming-destination.html.  I will not get into the particulars of creating the SSIS package here, but will recommend that any persons not familiar with SSIS to read the above linked post.

Let’s get started by opening SSMS and browsing to the SQL Server instance you want to use as your central data store.  I chose to create a new database called “SQLMngt_DW”.  The ultimate plan for this database is to store job history metadata for all SQL Server Instances.  Feel free to create your database where you see fit.

USE [master]
GO
 
CREATE DATABASE [SQLMngt_DW] 
GO

Now lets create a table to store server names.

USE [SQLMngt_DW]
GO
 
IF EXISTS(SELECT 1 FROM sys.tables WHERE NAME = 'Servers')
BEGIN
    DROP TABLE dbo.[Servers];
END
GO
 
--Create a Servers table to house all your instances
CREATE TABLE dbo.Servers(
InstanceId INT IDENTITY(1,1) PRIMARY KEY CLUSTERED,
InstanceName VARCHAR(50)
);
GO

Now we can insert some ServerNames into our dbo.Servers table.

USE [SQLMngt_DW]
GO
 
INSERT INTO dbo.Servers VALUES ('Instance1\dev');
INSERT INTO dbo.Servers VALUES ('Instance2\dev');

**Note: Make sure to insert some instance names into the dbo.Servers table; otherwise, your package will timeout when trying to dynamically change the connection string. Also, make sure you enter valid instance names.  The names above are dummy server names, you should alter the inserts for you environment.

We need to create on last table, called JobHistory.  This table will store job history data for all servers listed in the servers table.

IF EXISTS(SELECT 1 FROM sys.tables WHERE NAME = 'JobHistory')
BEGIN
    DROP TABLE dbo.[JobHistory];
END
GO
 
--Create a job history table
CREATE TABLE dbo.JobHistory(
JobHistoryId INT IDENTITY(1,1) PRIMARY KEY CLUSTERED,
ServerName VARCHAR(50),
JobId UNIQUEIDENTIFIER,
JobName VARCHAR(50),
RunDate DATETIME,
JobStatus VARCHAR(11),
Duration VARCHAR(10)
)

Now that we have our database and tables, we can start creating our package.  Create a new SSIS package and create two variables. One variable will need to be of object type and the other of string, as shown below.  The value for the string variable, which I named “connectionString” should have a value equal to the server name where you placed your centralized database.

image

Next drag the Execute SQL Task component to the canvas.  Your canvas should look like below.

image 

Open the Execute SQL Task and configure the general tab, as shown below. Make sure to create a connection to the instance where you created your database and JobHistory table. I named my connection SQLMngt_DW.

image

The code for the SQL Statement is below.

select InstanceName from dbo.Servers

Now, we need to configure the result set tab.  Make the appropriate configurations, as shown below.

image

Our SQL Task is fully configured.  We can proceed in creating the ForEach task.  Drag the ForEachLoop Container to the canvas.  Make sure to create a precedence constraint between the SQL Task and the loop.  Essentially, all you need to do is drag the green arrow from the SQL task to the ForEachLoop Container. Once the loop container is in place, you have to drag a data flow task into the container. Your canvas should look like the screenshot below.

image

Now we have to configure both controls.  Let’s start with the loop.  Double-click the foreachloop container to configure the properties.  I will start with the collection tab. 

image

Next configure the variable mappings tab, as shown below.

image

Now, we have to configure the Data Flow Task.  Create both a source and destination OLE DB task, within the Data Flow Task, and create a precedence constraint between the two.  Once the source and destination have been created, you should create a new OLEDB connection.  This connection string needs to point to any valid Instance. Note: It does not matter which instance you choose.  I have chosen to point my new connection to the same server as the SQLMngt_DW.  I named my new connection dyn_source (dynamic source).  Your canvas should look like below.

image

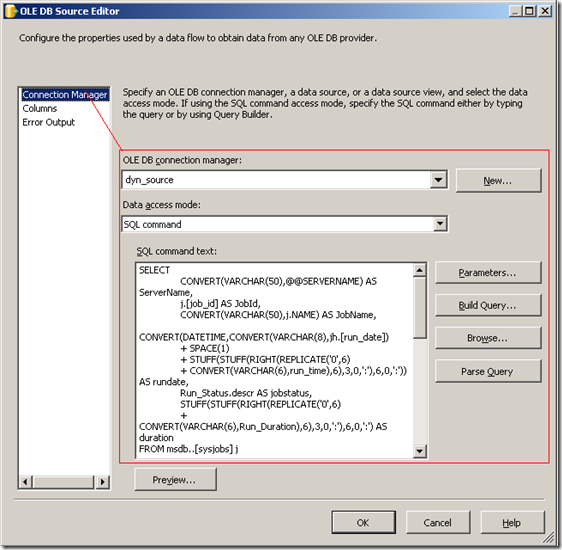
Now open the OLE DB Source, in the data flow task and configure it, as shown below.

Note: The code for the SQL Command is below the screenshot.
image

SQL Command Code:

SELECT 
    CONVERT(VARCHAR(50),@@SERVERNAME) AS ServerName,
    j.[job_id] AS JobId,
    CONVERT(VARCHAR(50),j.NAME) AS JobName,
    CONVERT(DATETIME,CONVERT(VARCHAR(8),jh.[run_date]) 
    + SPACE(1) 
    + STUFF(STUFF(RIGHT(REPLICATE('0',6) 
    + CONVERT(VARCHAR(6),run_time),6),3,0,':'),6,0,':')) AS rundate,
    Run_Status.descr AS jobstatus,
    STUFF(STUFF(RIGHT(REPLICATE('0',6) 
    + CONVERT(VARCHAR(6),Run_Duration),6),3,0,':'),6,0,':') AS duration
FROM msdb..[sysjobs] j
INNER JOIN msdb..[sysjobschedules] jsch
    ON j.[job_id] = jsch.[job_id]
INNER JOIN msdb..[sysschedules] sch
    ON jsch.[schedule_id] = sch.[schedule_id]
INNER JOIN msdb..[sysjobhistory] jh
    ON jh.[job_id] = j.[job_id]
INNER JOIN(
    SELECT 0 AS run_status ,'Failed' AS descr UNION ALL
    SELECT 1,'Succeeded' UNION ALL
    SELECT 2,'Retry' UNION ALL
    SELECT 3,'Canceled' UNION ALL
    SELECT 4,'In progress'
) AS Run_Status
    ON jh.[run_status] = Run_Status.[run_status]
WHERE
    j.NAME NOT LIKE 'Tivoli%' --tivoli backups
    AND j.[enabled] = 1
    AND sch.[enabled] = 1
    AND jh.[step_name] = '(Job outcome)'
    AND CONVERT(DATETIME,CONVERT(VARCHAR(8),jh.[run_date]) 
        + SPACE(1) 
        + STUFF(STUFF(RIGHT(REPLICATE('0',6) 
        + CONVERT(VARCHAR(6),run_time),6),3,0,':'),6,0,':')) 
        BETWEEN DATEADD(DAY,DATEDIFF(DAY,0,GETDATE()),0)
            AND DATEADD(DAY,DATEDIFF(DAY,0,GETDATE())+1,0)

Make sure to click the columns tab so SSIS can automatically set your columns for you.

Now let’s configure the destination.  The destination is actually quite simple.  We have to open the properties and choose our  SQLMngt_DW source and the JobHistory table, as shown below.  Make sure to select the mappings tab to verify all the columns are aligning properly.  You may see the JobHistoryId column is set to ignore, which is fine because this is an identity column and we do not want to insert directly into it.

image

Now we get to do the fun part :-), which is setting up the dynamic connection string via the connectionstring variable.  Right-click the dyn_source connection string and click properties.  Once the properties display, you can click the ellipses next to expressions and choose connectionstring.  Click the ellipses in the expression textbox to open the expression editor and paste the following expression:

"Data Source=" + @[User::ConnectionString] + ";Initial Catalog=msdb
;Provider=SQLNCLI10.1;Integrated Security=SSPI"
 
Note: I am using Integrated security. If your connection string is use SQL Authentication, you will need to supply username and password in the connection string.

image

Believe it or not, that is it!!!!   Click on the play sign at the top of the SSIS application to run the package.  We should see all tasks light up green, unless something is not configured correctly, in which case you will see red. 

image

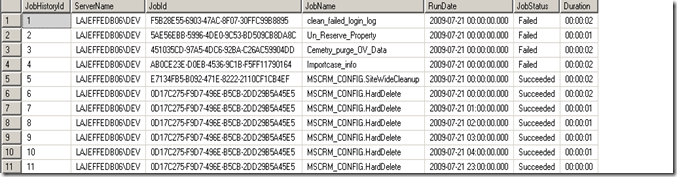
Our last step is to validate our package did what it is supposed to do.  We can validate this by querying our job table.
image

There you have it.  You now have a very flexible and scalable method to collect data from one or more sources.  The SSIS method really beats having to manage a command line solution or having to manage/deploy stored procedures to each server.  Configuring the SSIS package is not that tedious and can be done fairly quickly.  It actually takes a lot longer to describe how to do this, than actually do it.  Once you get use to using SSIS, this process should only take you 10-15 minutes to setup and configure.   I hope that you have learned something new and I know this will help some of you out there.  I know this post may seem overwhelming for those of you have not really had the opportunity to dive into SSIS yet, so I have provided a link, where you can download the project.  Please be aware that I am using SQL 2008 and BIDS 2008, so my package will not work with BIDS 2005, as the package structure changed in BIDS 2008.

Download the project files: http://cid-6f041c9a994564d8.skydrive.live.com/self.aspx/.Public/SSIS%7C_Data%7C_Collection/SSIS%7C_DataCollection.zip

Happy coding!!

Thursday, July 16, 2009

SSIS – Dynamically Naming Destination Output Files

When I am not wearing my DBA hat, I put on my BI (Business Intelligence) hat.  BIDs (Business Intelligence Development Studio) is a very powerful and scalable business intelligence software package that was introduced in SQL Server 2005.  Within BIDs, I will focusing on SSIS (SQL Server Integration Services) projects.  SSIS projects are designed to extract, transform, and load data, which is more commonly known as ETL.  In this post, I will be focusing on extracting data and loading it to a destination, there is no need for me to transform the data.  I will start by creating a new SSIS package.  You can launch BIDs by browsing to Start –> Programs –> SQL Server 2005/2008 –> SQL Server Business Intelligence Studio. Once BIDs has launched, you should click New Project and select Integration Services Project, as shown below.

image

We will name our project DynamicDestinationFileName.  Once the project is created, we will switch over to SSMS and create a sample table, in tempdb.  Log into your instance of SQL Server and execute the code below.

SET NOCOUNT ON;
GO
 
USE [tempdb]
GO
 
IF EXISTS(SELECT 1 FROM sys.tables WHERE NAME = 'MyTable')
BEGIN
    DROP TABLE dbo.MyTable;
END
GO
CREATE TABLE dbo.MyTable(
Id INT IDENTITY(1,1) PRIMARY KEY,
Col CHAR(1)
);
GO
 
INSERT INTO dbo.MyTable VALUES ('A');
INSERT INTO dbo.MyTable VALUES ('B');
INSERT INTO dbo.MyTable VALUES ('C');
INSERT INTO dbo.MyTable VALUES ('D');
INSERT INTO dbo.MyTable VALUES ('E');
GO

We have just created our SSIS data source, which means this is the table that will feed our destination flat file.  Switch back to BIDs and drag a “Data Flow” task to the designer, from the toolbox. You screen should look like below.

image

Now we can double-click the data flow task to configure it, or you can click the data flow task tab above the canvas.  We will need to drag a OLE DB data source and a flat file destination, from the toolbox.  Your canvas should look like below.

image

Select the OLE DB Source and drag the green arrow to the flat file destination.  Now, let’s configure the source.  Double-click the source and click New.

image

Click new again and then type in the database server where you just ran the scripts to create the table.  In the database dropdown select tempdb.  Your connection should look like below.  You can test your connection by clicking the test connection button.  After testing the connection, click ok to apply the changes and then ok again. 

image

Now choose MyTable from the table dropdown. 

image

Once you select the table, click the columns tab to assign columns to the data source.  Click Ok and were down with the data source!!!! Now let’s move onto the destination.

image

Double-click the flat file destination and create a new connection.  When you click “New” to create the destination connection a window will popup and ask for the flat file destination format. 

The options include delimited, ragged right, fixed-width etc.  The differences between these types is not relevant to the task at hand, and will not be covered here.  BOL has a lot of information about the differences between output types.  Okay, lets move on by selecting delimited and ok.

image

Now we will need to define the properties of the destination file. Click the browse button to choose where the destination file will be created.  I will be creating my file to the C:\MyTable.txt.  you may be screaming, HUH!!!!, YOU SAID THE DESTINATION NAME WOULD BE DYNAMIC!!!!!!  Do not fret it will be and I will show you how to transform the static destination to a dynamic one, in a few minutes.

image

Okay now, click the columns tab on the left to make sure the columns look correct.  You should see the columns Id and  Col.  If everything looks good, click ok.  Note: there should not be any data because the flat file is empty at present, but the columns should still be correct.

image

Now we should be in the destination editor window.  Click the mappings tab, as shown below and make sure everything aligned properly. If so, click ok.

image

I hope you are still with me :-).  Finally we can get to the meat of the post.  Select the Flat file connection manager in the connection managers pane –> right-click and choose properties and click the ellipses next to “expressions”, as shown below.

image

Choose connection string from the dropdown and then click the ellipses in the expression box.  You will have to build the expression to create the destination connection string.  The expression editor uses VB coding, so that may be a benefit for some of you out there.  I have provided the code below to build the expression.  Click the evaluate button to see what the connection string will evaluate too. Note: I had to use double backslash because it is required because the backslash acts as a escape character, in the expression editor.

Note: I like to use variables to store file paths because it makes the code cleaner and is easier to modify the package, as you only need to update the variable in once, whereas, you may have to update lots of expressions, if they are hardcoded.

"C:\\MyTable_" +
Right("0" + (DT_STR,4,1252) DatePart("m",getdate()),2) +
Right("0" + (DT_STR,4,1252) DatePart("d",getdate()),2) + 
(DT_STR,4,1252) DatePart("yyyy",getdate()) + ".txt"

Here is what the expression looks like and should evaluate too.

image

Now lets, run our package and test it out. Click the green play symbol to run the package.  When you run the package all the tasks should turn green, which indicates they succeeded.  If yours turned red, something went wrong. 

image

Now we just have to make sure our file is where we put it and the name contains today’s date in MMDDYYYY format. 

image

We are good, the package did everything we wanted it too.  So there you have it…. a method to create a destination file, with a dynamic name.  It is really quite easy to do, the tedious and mundane part is creating and setting up the package itself.  I hope you learned something new and can use this now or somewhere down the road. 

Stay tuned, I will be posting a lot more BI solutions, tips,  and tricks.